
Advanced Technique: the Front Roll-Fall
The front roll-fall technique uses the third principle of Fearless
Falling, rolling, to absorb and redirect the dangerous forces of a forward fall at
speed. This kind of fall usually happens when engaging in some
sport activity: skating, skiing, biking, running, Parkour, etc..
The bad things about these falls are the velocity and danger; the good
thing is that you are usually aware of the potential hazard, so are not
as startled and have more time to apply a safe falling technique.
* * * IMPORTANT NOTE * * *
The
roll-fall technique requires some arm strength, core strength, and good
chin-tuck and rolling skill. You should not attempt to learn the
front roll-fall technique until you have mastered the basic
"tuck-sit-roll" side back-fall method.
 The
main idea is to transform the energy of your forward and downward
momentum into angular momentum: the forward rolling of your whole
body. You essentially shape your body into a hoop which then
rolls across the ground. By curling up and tucking your head out
of the way you land mostly on your back shoulder area
instead of striking face or head-first. The energy of the
fall is absorbed by rolling across your back and landing on the
side of your back
and buttock. At the end, the side of one leg and both feet hit, and the
whole body slides across the ground a bit. In the most advanced
version, the legs are pulled in closer, and
the remaining angular momentum is used to lift you right back up off of
the ground into a standing position. This slick method allows you to avoid scraping along the ground to "burn
off" the excess energy of the fall.
The
main idea is to transform the energy of your forward and downward
momentum into angular momentum: the forward rolling of your whole
body. You essentially shape your body into a hoop which then
rolls across the ground. By curling up and tucking your head out
of the way you land mostly on your back shoulder area
instead of striking face or head-first. The energy of the
fall is absorbed by rolling across your back and landing on the
side of your back
and buttock. At the end, the side of one leg and both feet hit, and the
whole body slides across the ground a bit. In the most advanced
version, the legs are pulled in closer, and
the remaining angular momentum is used to lift you right back up off of
the ground into a standing position. This slick method allows you to avoid scraping along the ground to "burn
off" the excess energy of the fall.
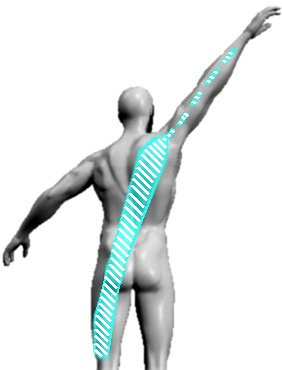
The figure to the left shows the areas of the body that are used to
absorb the force of the roll-fall. The extended arm is "dashed"
because it does not absorb much force -- it only guides the upper body
into the roll. The major force absorption is by the upper back,
behind the shoulder, down across the back to the opposite gluteal
muscles and into the back of the thigh and side of the leg.
Note: you do NOT roll across the hip bone (major trochanter) in a proper roll-fall.
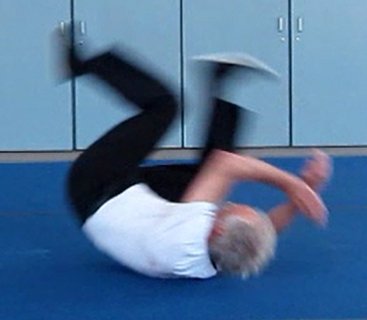
The First Roll-Fall Step: Rolling at floor-level.
NOTE: the "floor" in these photos is a gymnastics mat. You should learn these movements on a cushioned mat.
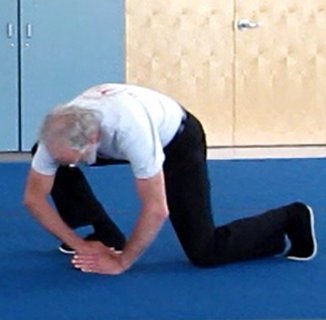 The lead arm must be rotated inward and gently bent. The
extended fingers of the hand are pressed together, and they point downward
and backward towards your legs. This arches the arm in
front of you with the elbow up above the hand.
Note: your lead elbow is pointing out in the direction of the
roll.
The lead arm must be rotated inward and gently bent. The
extended fingers of the hand are pressed together, and they point downward
and backward towards your legs. This arches the arm in
front of you with the elbow up above the hand.
Note: your lead elbow is pointing out in the direction of the
roll.
The other arm is arched with the fingers pointing forward. Your two
hands are close to each other,
pointing opposite directions, so that your two arms form an angled hoop.
Tuck your chin towards your chest on the lead arm side, and your
head will be close to the hoop formed by your arms.
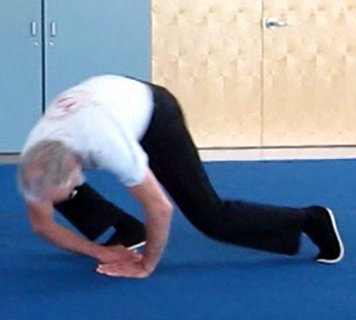 Push off with your rear foot, and tighten your core muscles to hold the
curved body shape. Keep your lead arm "springy" and extended, so
you will roll right over it to the back of your shoulder.
Push off with your rear foot, and tighten your core muscles to hold the
curved body shape. Keep your lead arm "springy" and extended, so
you will roll right over it to the back of your shoulder.
The position and angle of the lead arm (the right arm in these
pictures) is key to a smooth roll-fall. The arm does not have to
support the weight of your body; it just acts as a curved "guide rail"
to initiate the forward rotation. But, if you let this lead arm
collapse, or fold it in to your side, your shoulder will plow into the
ground.
 By keeping your lead arm slightly extended and rotated inward, you roll
right over the elbow joint and up the back of the arm over the triceps
and onto the deltoid muscles of the shoulder area. The slightly
extended and rotated position of the arm is very important to maintain
a large, open, angle at the shoulder joint. If the arm is dropped
down and folded in close to the body, with an acute angle at the
shoulder, you will hit right on the shoulder joint instead of rolling
over it.
By keeping your lead arm slightly extended and rotated inward, you roll
right over the elbow joint and up the back of the arm over the triceps
and onto the deltoid muscles of the shoulder area. The slightly
extended and rotated position of the arm is very important to maintain
a large, open, angle at the shoulder joint. If the arm is dropped
down and folded in close to the body, with an acute angle at the
shoulder, you will hit right on the shoulder joint instead of rolling
over it.
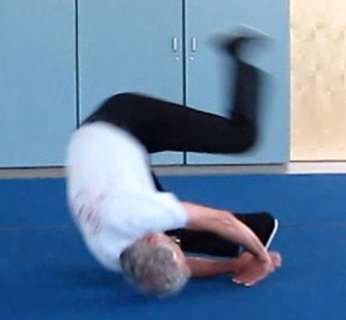
 As you continue rolling, try to maintain the curve of your body,
and keep the legs bent at the knee. The brunt of the first
contact with the ground is taken by the muscles of the upper back in
the shoulder blade area. Rolling at an angle across
the back, the force is spread across the trapezius and latissimus down
to the lower back, and then across the spinal area to the upper gluteal
muscles on the opposite (in these pictures, the left) side. This roll
angle, from right shoulder to left gluteus, gives the maximum contact
area and avoids rolling down the spine on the vertebrae and hitting the
tailbone.
As you continue rolling, try to maintain the curve of your body,
and keep the legs bent at the knee. The brunt of the first
contact with the ground is taken by the muscles of the upper back in
the shoulder blade area. Rolling at an angle across
the back, the force is spread across the trapezius and latissimus down
to the lower back, and then across the spinal area to the upper gluteal
muscles on the opposite (in these pictures, the left) side. This roll
angle, from right shoulder to left gluteus, gives the maximum contact
area and avoids rolling down the spine on the vertebrae and hitting the
tailbone.
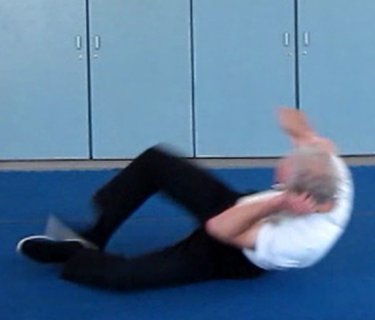 In the final phase, the lower gluteus maximus will impact the mat, followed by the left
leg (in these photos) which will come over and strike the mat on its
side. The right leg should strike with the foot alone; preferably
the ball or sole of the foot, not the heel.
In the final phase, the lower gluteus maximus will impact the mat, followed by the left
leg (in these photos) which will come over and strike the mat on its
side. The right leg should strike with the foot alone; preferably
the ball or sole of the foot, not the heel.
Notice the roughly 45 degree angle to the floor of the
hips and frontal plane of the body. This is very important to keep the
hip bone (major trochanter) from striking the ground. The final impact
is spread between the left butt cheek (the gluteus maximus) and the
outer thigh of the left leg.
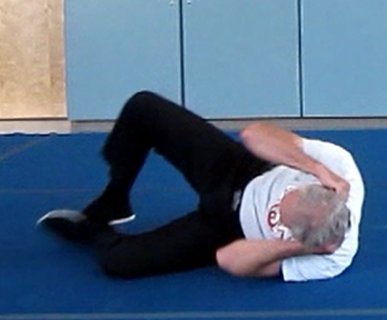 The arms and hands wrap protectively around the head as the roll finishes, still in a slightly angled position.
As seen in the video below, the energy generated by the roll is
absorbed by the sequence of body contacts, ending with the feet
striking, and the remainder is
"burned off" by the friction of the body sliding across the mat a bit.
In the beginning learning stage, at low speed with proper mats,
this is not a
problem.
Remember, the most important objective in a head-first forward falling method is
to protect the head from traumatic brain injury. Some scrapes and
bruises from sliding on a hard surface are a small price to pay for avoiding a serious or fatal head injury.
Here is a full floor-level practice roll, shown at half-speed.
This is usually called a "right-side roll-fall" because it starts
on the upper right side.
You should always practice roll-falls on both your right and left sides.
The Roll Fall from a Standing Position
The next step is to start from a higher position.
First, just crouch down very close to the kneeling position
shown above to practice the rolls. Then gradually stand a little higher until you can confidently
start your roll from a normal standing position. At this height,
it is important to think of the lead arm as the start of a great curve,
arcing down to the mat with your body following its line. Here is
a full practice roll to side-fall position at normal speed:
Again, notice how stopping the rotation at the end of the roll fall transforms the angular momentum back
into forward momentum. Some of the energy of the fall is lost
through the action of the back, buttocks, legs, and feet striking the
mat. The remaining kinetic energy must still be
dissipated by frictional heat loss as the body slides across the mat.
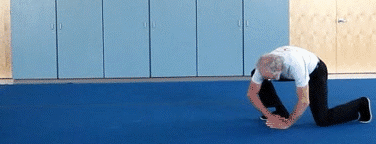
The Complete Roll Fall back up to Standing Position
The final version of the roll fall recovers the energy in the
angular and forward momentum of the fall by using it to lift the weight
of the body back up from floor level to a standing position again.
 This
neat trick is done by folding the left leg (in this "right-side" roll)
in closer to the pelvis, with the right foot coming over a bit ahead of
it.
This
neat trick is done by folding the left leg (in this "right-side" roll)
in closer to the pelvis, with the right foot coming over a bit ahead of
it.
The body is kept in a circular shape, and essentially just keeps rolling.
As the center of mass lifts up over the feet, the forward and
angular velocities are both reduced as the energy is drawn off by the work required
to lift the whole body back up to a standing position. In this demonstration, with little forward momentum to start, the
kinetic energy gained in the fall closely matches the energy needed to return
to standing.
In a higher speed fall (from running or biking), you may have to take several steps to run off
the energy at the end, or even do two or more consecutive rolls.